Starsiege: Tribes/Guides/Tribes 1.11/Hosting-Dedicated: Difference between revisions
(Page created, need to come back and add a picture a update link) |
m (Updated image) |
||
| Line 31: | Line 31: | ||
===== Step 5 ===== | ===== Step 5 ===== | ||
The final step is to run the new shortcut. If you are using Windows XP, you will need to click ''Unblock'' if a Windows firewall dialog box comes up asking if it should continue blocking the application. When the shortcut has been executed, you should see two windows, like the ones below: | The final step is to run the new shortcut. If you are using Windows XP, you will need to click ''Unblock'' if a Windows firewall dialog box comes up asking if it should continue blocking the application. When the shortcut has been executed, you should see two windows, like the ones below: | ||
[DoSFix.jpg] | |||
[[Image:DoSFix.jpg]] | |||
Put checkmarks in the three boxes at the bottom of the DoSFix program and minimize it. Everything should then minimize into the system tray. | Put checkmarks in the three boxes at the bottom of the DoSFix program and minimize it. Everything should then minimize into the system tray. | ||
Latest revision as of 23:54, 29 August 2023
When you load Tribes, there are quite a few servers to choose from. This tutorial describes how to host your own server for others to play on.
Step 1
The first thing you need to do is make a separate Tribes directory for the server. Don't use one that you play with. It shouldn't have any special scripts or configs in it. If you would like a stripped down copy of Tribes, you can download one here: Tribes
It is possible to use one with configs in it, but things like custom models can cause users to be unable to play on it.
Step 2 (Windows XP and lower)
Next, you need to download a special program to host the server. Tribes comes with its own, InfiniteSpawn, however the one we will use has built-in crash protection for things like packet flooding. You can get it here: Tribes DoSFix
Once you have it downloaded, extract TribesDoSFixIS.exe to your Tribes directory.
Step 3 (Windows XP and lower)
Now we need to create a way to launch the game. Right click on TribesDoSFixIS.exe and click Create Shortcut. Now right click on the new shortcut and click Properties. In the Target Path box, add -mod <name of mod folder> -dedicated at the end of the path.
For example, if I wanted to host an Annihilation server, my target path would be: C:\Modding\TribesDoSFixIS.exe -mod annihilation -dedicated
Click OK and you're done.
Step 4 (Windows Vista and higher)
Right click on InfiniteSpawn.exe and click Create Shortcut. Now right click on the new shortcut and click Properties. In the Target Path box, add tribes.exe -mod <name of mod folder> -dedicated at the end of the path.
For example, if I wanted to host an Annihilation server, my target path would be: C:\Modding\InfiniteSpawn.exe tribes.exe -mod annihilation -dedicated
Click OK and you're done.
Step 5
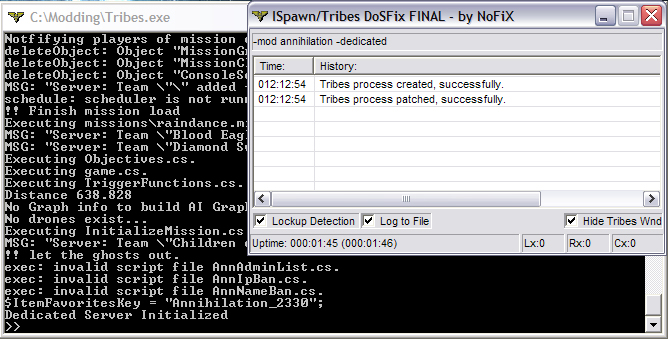
The final step is to run the new shortcut. If you are using Windows XP, you will need to click Unblock if a Windows firewall dialog box comes up asking if it should continue blocking the application. When the shortcut has been executed, you should see two windows, like the ones below:
Put checkmarks in the three boxes at the bottom of the DoSFix program and minimize it. Everything should then minimize into the system tray.
Step 6
You may need to open some ports to allow Tribes to be seen by users outside of your network. Follow this tutorial: Port Forwarding
