Tribes: Ascend/SDK/T1 Heightmaps
A heightmap is a grayscale image that represents the height of a terrain. The height is determined by the color of the pixel in the image. Black represents the lowest point on the terrain, and white represents the highest point, with all other points being a shade in between black and white. Heightmaps can be imported into the UDK and used as terrain. The reason this is important is because the UDK's terrain tools lack the refinement and features that standalone programs designed solely for creating terrains have. These tools can generally export out heightmaps which can then be used in the UDK. Another reason is that the terrains from Starsiege: Tribes have been converted to heightmaps, and would allow mappers to recreate the classic T1 maps.
This tutorial will cover importing a T1 heightmap into the UDK. The heightmaps can be downloaded here and were created by Andrew.
Tools Required
- TerreSculptor - http://www.lilchips.com/hmesalpha.htm
- A heightmap, which can be created with the software above.
- UDK - January 2011 Build
How Starsiege: Tribes terrains work

If you have ever played Tribes, and have gone exploring past the out of bounds, you will have noticed that Tribes tiles or repeats the terrain before you hit the end of the world. This is so that players never see the end of the world when they play inside of the bounds.
Tiling
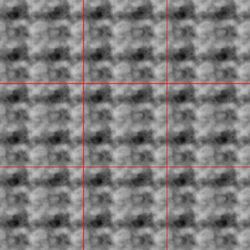
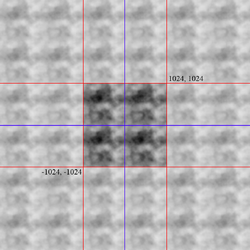
Tribes actually tiles the terrain three times in the X direction, and the Y direction. You can check this for yourself by looking for the shadows of the bases on the terrain. Dynamix baked the base shadows on the terrain. The image to the right shows the tiling that Tribes uses. However, if you look at the image, you will notice that it is tiled six times in the X and Y. That's not really important to us because our heightmap fits within one of the tiles that is outlined in red. We really only care about the one tile in the middle.
Terrain Dimensions

If we open the .mis file for Broadside with Notepad, and look in the instant SimTerrain section, we will see that the position of the terrain is located at "-3072, -3072, 0." This is the corner at which the corner tile is located. Since we know that it is being tiled three times, this tells us that one terrain tile has a length and width of 2048.
TerreSculptor

The following will be more of a step by step tutorial since most of the explanation has already been taken care of.
- Start TerreSculptor
- A prompt should appear when it is started, click on Import an existing file
- Change the file type dropdown to Raw Binary (*.raw)
- Browse to your heightmap and choose the 16i_broadside.raw file.
- Click Open
- A new window appears with Import RAW settings, the defaults are fine, just click OK
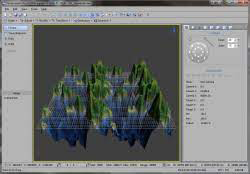
- You should now see something similar to the image on the right.
While the terrain obviously looks wrong, it is ready to be sent to the UDK.
- Click File
- Click Export
- Change the Save as type to Unreal Engine 3 T3D Terrain (*.t3d)
- Give the file a name, and click Save
- A new window will come up with Export Epic T3D settings.
- The only setting you need to change is the DrawScale3D.Z
- 256 is a standard size used for heightmaps and terrains. Before, we said that our X and Y dimensions were 2048, so this 256 is a lot smaller, 8 times smaller to be precise. To figure out what our Z needs to be, we need to take 256 and divide it by 8. The T1 heightmaps have a maximum value of 255 and a minimum value of 0, for a range of 256. So, the Z will always be 32 for a 256 x 256 map.
- Set DrawScale3D.Z to 32.
- Click OK
Your terrain is now exported out.
Smoothing out your terrain (Optional but highly recommended)
Tribes was not known for its amazingly smooth terrains, and it was quite pointy in some places, so it would be a very good idea to smooth the terrain, otherwise when you ski in Ascend, it will either be very bumpy, or cause a deadstop.
These steps take place right before you export your terrain.
- Click on the Modify tab.
- Click Smooth at the bottom of the list.
- Play with the settings and smooth the terrain to what you want, don't smooth it too much or you will lose some of the detail.
- Try to stick with a 3x3 brush and a strength of less than 10.
- When done, click OK
Now contine with the export instructions above.
UDK
The following will be another step by step tutorial.
- Click the Terrain Editing Mode button, the icon with the mountain on it, or press Shift+3.
- The Unreal TerrainEdit window will pop up, click on the Import button in the Import/Export section.
- Navigate to where you exported your terrain from TerreSculptor, and click Open.
- Wait for the UDK to import your terrain.
- Once the terrain is imported, you can close the Unreal TerrainEdit window.
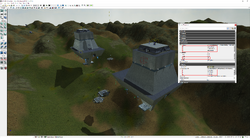
- It should look a bit different than what you saw in TerreSculptor, it should have corrected the Z value. If however, your terrain does not look like it should, you may have left the Z value at 256.
- To fix this, left click on the terrain, and press F4 to pull up the properties.
- In the Display section, go to the Draw Scale 3D settings and change the Z to 29.01.
- It may be hard to see the detail of your terrain, so you may want to add in a Directional Light.
- Right click anywhere
- Go to Add Actor
- Then click on Add Light (DominantDirectionalLight)
You now have a Tribes 1 heightmap in the UDK.
UDK Coordinate System
If you plan on using the coordinates from Tribes to place your objects into the map exactly where they were in Tribes, we will need to do a few things.
First off, the terrain in the UDK is positioned at 0, 0, 0. In Tribes it was placed at -3072, -3072, 0. We need 0, 0, 0 to be at the center of our map, like it was in Tribes. To do that, we need to move the terrain. The terrain in the UDK has a length and width of 65536, so we divide that by two, which is 32768. With the terrain selected, pull up the properties window if it is not open (Press F4) and go to the Movement section and look at the Location settings. For the X and Y, set it at -32768. Now 0, 0, 0 is at the center of our terrain, just like in Tribes.
Since the terrain is so much larger than the one in Tribes, we need to set up a ratio between the two coordinate systems. The original Tribes terrain went from 3072 to -3072, and our terrain goes from -32768 to 32768. Now remember, we are only using one tile, the center tile, so we need to subtract 2048 from those coordinates, which will give us the location of the center tile in Tribes, which is -1024, -1024, 0. If we divide 32768 by 1024 we get 32. That means that the coordinate system in the UDK is 32 times larger, so you need to take the Tribes coordinates and multiply them by 32.
Example:
One of the Broadside bases is located at -182.177, -208.289, 180.895. If we multiply all of those values, we get -5829.664, -6665.248, 5788.64.
IMPORTANT

For some reason the UDK flips the X and Y coordinates, and the terrain comes in rotated. To fix this, rotate the terrain 180 degrees, and then move it to 32768, 32768, 0 so that 0,0,0 is at the center of the terrain. Since the X and Y coordinates are flipped, that means that instead of having one base at -5829.664, -6665.248, 5788.64, it is now at -6665.248, -5829.664, 5788.64. Also, you will notice that the base is way above the ground, the terrain needs to be moved up by 3072. So the final position of the terrain should be at 32768, 32768, 3072 with a Yaw of 180 degrees (In the rotation section) and a Draw Scale of 256, 256, 32.
Now you have a properly set up terrain and are ready to paint the terrain. To do that, look on YouTube for some video tutorials.